
Introduction
I’ve been on a mapping kick lately – as input tables make data entry and writeback easier, they come with some pitfalls: misspellings, circular references, and cowboy mapping.
Today I want to show you a new strategy for handling mapping effectively in Sigma (sometimes called crosswalk tables by AI) using the new Unnesting feature. This handles a mapping use case where you have a source system that attaches IDs to values, and you’re mapping the values to a second system. TL;DR – Map to the IDs, not to the values.
Note: If you’re doing mapping in Sigma without telling your data team, please tell them you have a mapping use case, they will want to know about it!
Need access to Sigma?
Note: You will only have view access to WOW Workbooks, Folders, and Workspaces, not edit access. Please create your WOW Workbooks under “My Documents.” We suggest creating a folder to organize all your workbooks.
Requirements
1. Data Sources
Source Tables
You’ll need two CSV files or database tables:
- System Vendor Names (
source_of_truth.csv): Your canonical list of standardized vendor names.- Columns:
Vendor Name,Vendor ID - Example: “Acme Corporation”, “ACME123”
- Columns:
- Manually Input Vendor Names (
secondary_system_data.csv): The messy, manually entered vendor names from various systems that need to be mapped.- Column:
Vendor Name - Example: “Acme Corporation”, “Acm Corp”, “ACME Corporaton”
- Column:
2. Creating Your Source Page
Page Setup
Create a page called “Source”.
Add Source Tables (Two level tables side-by-side):
- Manually Input Vendor Names (left side)
- Source:
secondary_system_data.csv - Display the
Vendor Namecolumn. - Purpose: This shows all 126 vendor names that need standardization.
- Source:
- System Vendor Names (right side)
- Source:
source_of_truth.csv - Display:
Vendor Name,Vendor ID - Purpose: This is your source of truth with ~50 standardized vendor names.
- Source:
3. Creating the Mapping Interface
Page Setup
Create a page called “Mapping”.
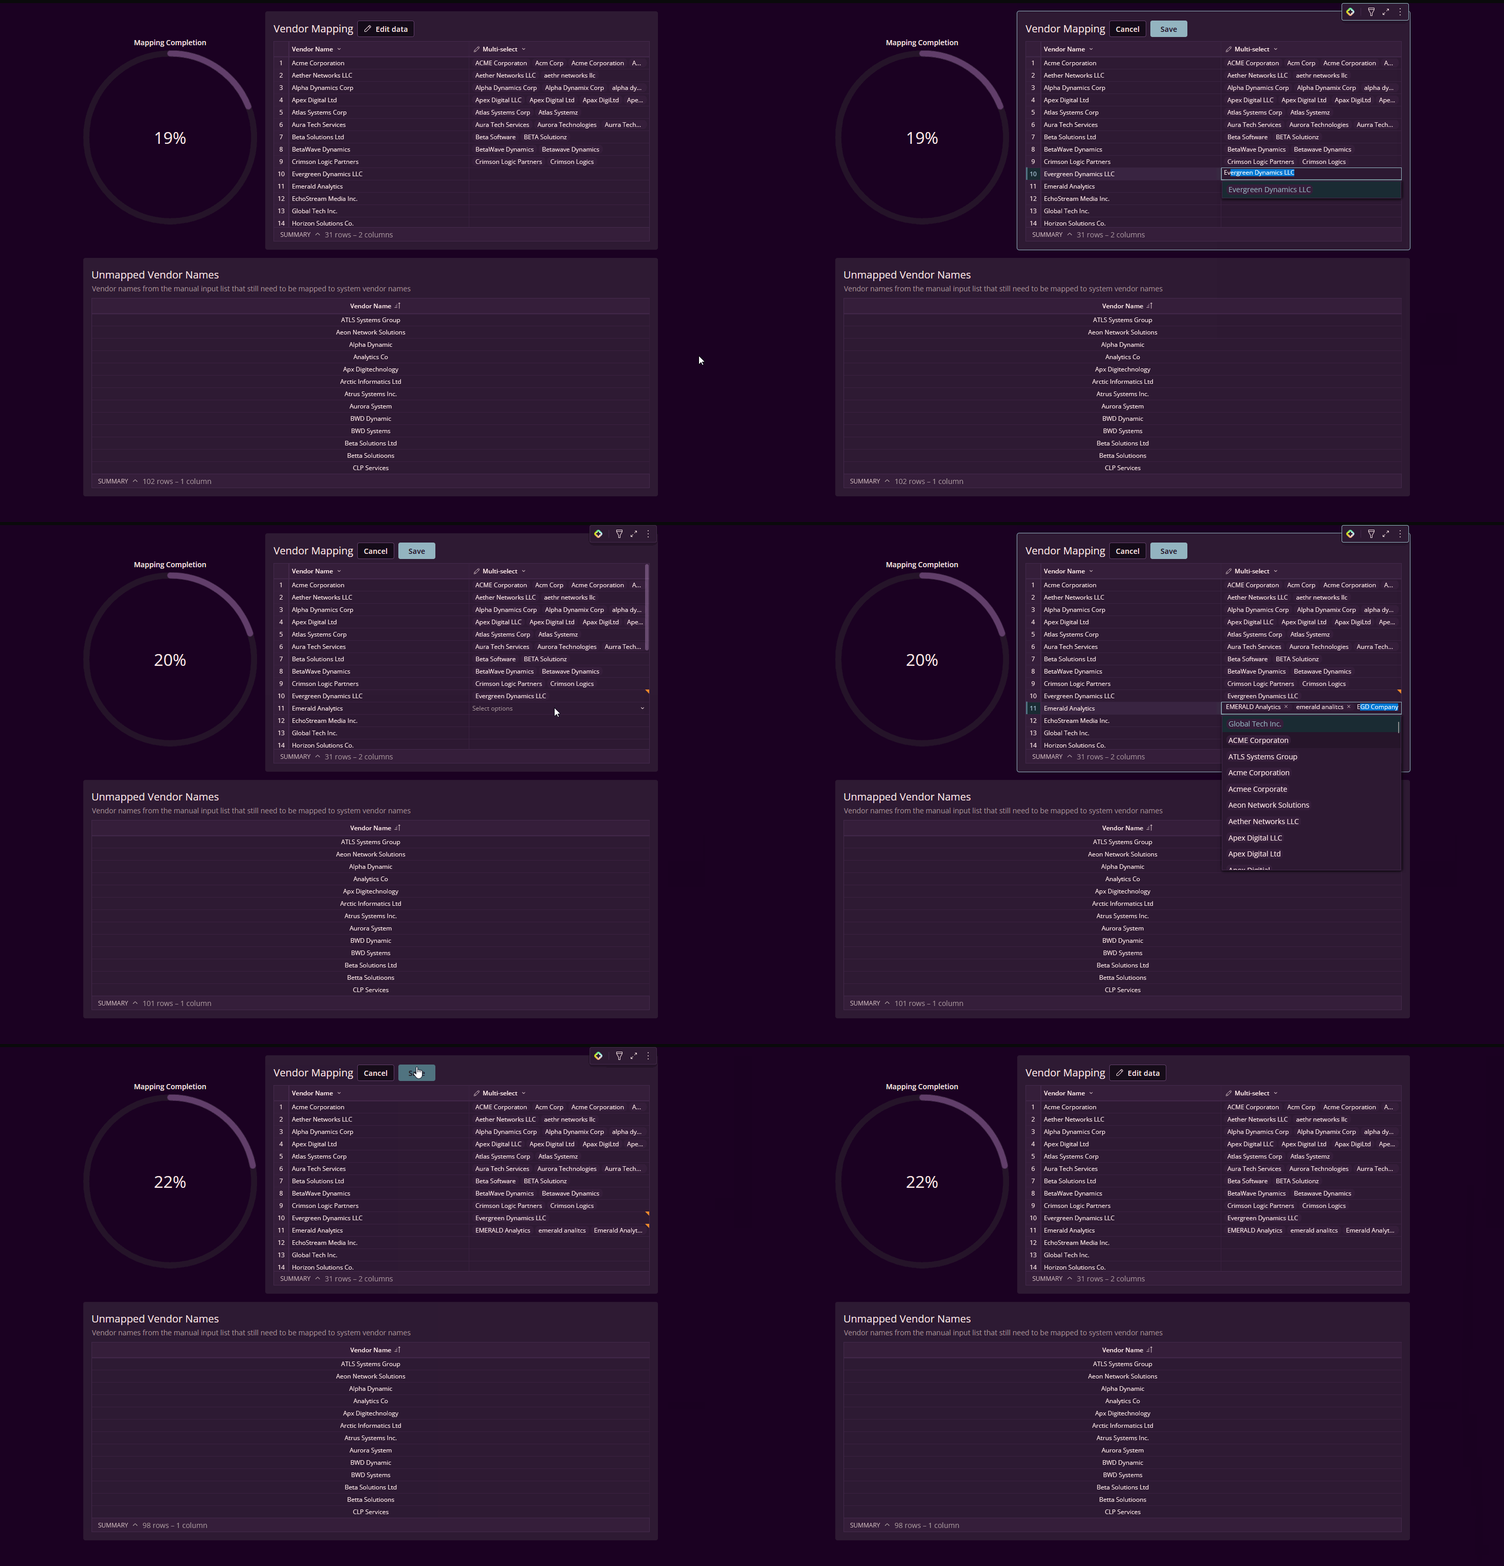
Create the Linked Input Table (“Vendor Mapping”):
- Source: System Vendor Names table
- Primary Key: Use
Vendor IDto uniquely identify each system vendor. - Add a Multi-select input column:
- Column name: “Multi-select” (or “Mapped Vendor Names”)
- Type: Multi-select
- Data Validation: Column reference to Manually Input Vendor Names >
Vendor Name - Function: Allows users to select multiple manually entered variants that map to each system vendor.
Example mapping:
Acme Corporation (ACME123)→ Select: [“Acme Corporation”, “Acm Corp”, “ACME Corporaton”, “Acmee Corporate”]Atlas Systems Corp (ATLS002)→ Select: [“Atlas Systems Corp”, “Atlas Systemz”]
Add Visual Feedback:
- Progress Bar:
- Mode: PERCENT
- Value: KPI – Completion Percentage
- Unmapped Vendor Names Table:Shows vendor names that still need mapping. Built using a LEFT JOIN (covered in section 4).
4. Creating the Transform Layer
Page Setup
Create a hidden page called “Data Sources” (or “Transform”).
Unnest the Multi-Select Column (“TRANSFORM – Unnest of Vendor Mapping”):
The multi-select column stores arrays like ["Acme Corporation", "Acm Corp"]. You need to unnest these into individual rows:
- Source: Vendor Mapping linked input table
- Operation: Use an “Unnest” operation to expand the multi-select array into separate rows.
- Result columns:
Vendor Name(from System Vendor Names)Vendor IDVendor Name Mapped(each value from the multi-select array becomes its own row)
Example transformation:
Before (1 row): Acme Corporation | ACME123 | ["Acm Corp", "Acme Corporation", "ACME Corporaton"]
After (3 rows):
- `Acme Corporation | ACME123 | Acm Corp`
- `Acme Corporation | ACME123 | Acme Corporation`
- `Acme Corporation | ACME123 | ACME Corporaton`
Create Supporting Calculation Tables:
TABLE ELEMENT: Completion Calculation:
- Source: TRANSFORM – Unnest table
- Add a column to the grouping, then add the following Calculations:
Mapped Count:CountDistinct([Vendor Name Mapped])excluding nullsTotal Count:[Distinct Manually Input Vendor Names/CountDistinct of Vendor Name]Completion Percentage: (Mapped Count/Total Count)
- Remove the column you grouped to set these calculations up as grand totals
KPI ELEMENT: Completion % KPI:
- Source: Completion Calculation
- Displays the Completion Percentage (you do not need to aggregate the value)
Unmapped Vendor Analysis (LEFT JOIN):
- Unmapped Stage 1: Source: Manually Input Vendor Names (All 126 vendor names, left side of join).
- Unmapped Stage 2: Source: TRANSFORM – Unnest table (All successfully mapped vendor names, right side of join).
- Final Unmapped Table:
LEFT JOINUnmapped Stage 1 to Unmapped Stage 2 onVendor Name.- Filter: Show only rows where the right side is
NULL(no match found). - Result: 117 unmapped vendor names.
KPI Formula Example (Completion Percentage):
Round(
  CountDistinct(If(IsNotNull([Vendor Name Mapped]), [Vendor Name Mapped], Null))
  / [Completion & KPI/Completion Percentage],
  2
)
5. Displaying the Results – Back on the Mapping Page
Add Progress Indicator:
- Progress Ring
- Value formula:
[Completion % KPI/Completion Percentage] - Shape: Ring
- Mode: Percentage
- Value formula:
Add Unmapped Vendor Names Table (Bottom Section):
- Table Source: Final Unmapped Table (LEFT JOIN result).
- Content: Show only the
Vendor Namecolumn. - Sorting: Alphabetically.
- Display: 117 unmapped vendor names.
- Description: “Vendor names from the manual input list that still need to be mapped to system vendor names.” (Updates automatically).
6. Key Formula Patterns
- Completion Percentage
Round(
  CountDistinct(If(IsNotNull([Vendor Name Mapped]), [Vendor Name Mapped], Null))
  / [Completion & KPI/Completion Percentage],
  2
)
7. Extensions & Next Steps
Assignment & Workflow
- Assign Data Stewards:
- Add a “Data Owner” column to the *System Vendor Names* table.
- Filter the `Vendor Mapping` table by owner for targeted cleanup.
- Add completion tracking per owner.
- Validation Workflow:
- Add a “Validation Status” column (e.g., Pending, Approved, Rejected).
- Create filters and controls to show only pending mappings.
- Add a date column to track when mappings were last reviewed.
Alternative: AI-Powered Mapping
Instead of manual multi-select mapping, you could use an AI column:
- Create a table sourced from *Manually Input Vendor Names*.
- Add an AI Column:
- Model: Claude 4.5 Haiku
- Prompt: “Classify [Vendor Name] into one of the following standardized names: [list your system vendor names]. If unsure, return ‘UNSURE’.”
- Review and validate AI results.
- Use the AI classification to populate the mapping table. (Recommended for large datasets).
Dataset
None, these are generated manually.
Share
After you finish your workout, share on LinkedIn, Sigma’s Community page, (or Twitter) using the hashtags #WOW2026 and #SigmaComputing, and tag Ashley Bennett, Eric Heidbreder, Stanley Gai, and Carter Voekel!
Create an interactive, sharable version of your solution here.
Also, make sure to fill out the Submission Tracker so that we can count you as a participant this week to track our participation throughout the year.
Solution
Coming Soon!